

Front Disc Brakes
A vehicle’s front brakes do approximately 70% of the stopping, therefore the front brakes generally wear out twice as fast as the rear brakes do. Because the front brakes do the majority of the stopping, the heat generated by the front brakes also is significantly more than by the rear brakes. Therefore, front brakes and especially disc brakes do a fantastic job at cooling, due to the front brake rotors having a sufficient ventilation system, and being exposed to the outside air. This method of cooling helps to eliminate any brake fade, or loss of braking that is caused by excessive high temperatures.
Although, front brakes do pose some potential problems during heavy or severe braking because the brakes cannot dissipate the heat fast enough. This rapid braking can cause particles from the brake lining and the hot gases from the heat to lubricate the brake pads and the brake rotors—reducing friction and causing slippage. The harder and more frequently you use your brakes, the more likely this is to occur.
Front brakes can however, give a driver a number of warning signs ranging from vibrations in the steering wheel when the brakes are applied to brake pulls, squeaking when the brakes are applied or constant squeaking without applying the brakes and metal to metal grinding sounds. Most of the time, if the vehicle is capable of stopping, brake concerns or noises can be pinpointed to a specific location or area of the brake system by taking the vehicle on a thorough test drive--feeling, listening and observing how the brakes are sounding, responding and behaving. Whether a test drive is possible or not, performing a thorough brake inspection before attempting any repairs and coming to any conclusions should always be the first step to a successful brake repair.
After identifying a front brake problem, take the necessary steps as follows to guide you through the proper brake changing procedures. It cannot be emphasize enough that prior to attempting any brake repairs, having a firm understanding of how the brakes act and respond will help to speed up the brake repair process.
Featured Video
Step 1
Remove the caliper from steering knuckle or spindle
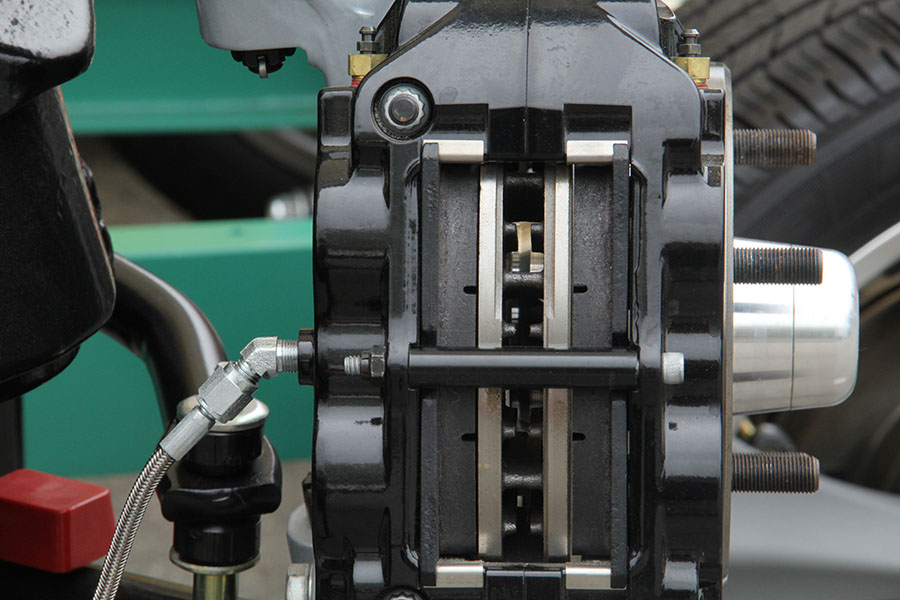
When replacing the front brakes it is good to be aware of the number of pistons that the brake caliper has and whether the caliper has pistons on both the inside and outside. If the caliper does not have pistons on both the inside and outside, then proceed to the next step.
As long as there are pistons on both sides of the caliper, removing the brake pads first is preferred. These types of calipers consist of two pins, which are inserted into the caliper--holding the brake pads in place.
There are two basic methods for removing these caliper pins depending on the vehicle. The first method consists of using a small pair of straight needle nose pliers to pull two clips out of the ends of the two pins. Once the clips have been removed, lightly tap on the end of the pins with a small hammer and use the pliers to pull the pins out of the caliper. The other method is used when the pins have no clips. Then, they have to be pressed out with a small punch and hammer.
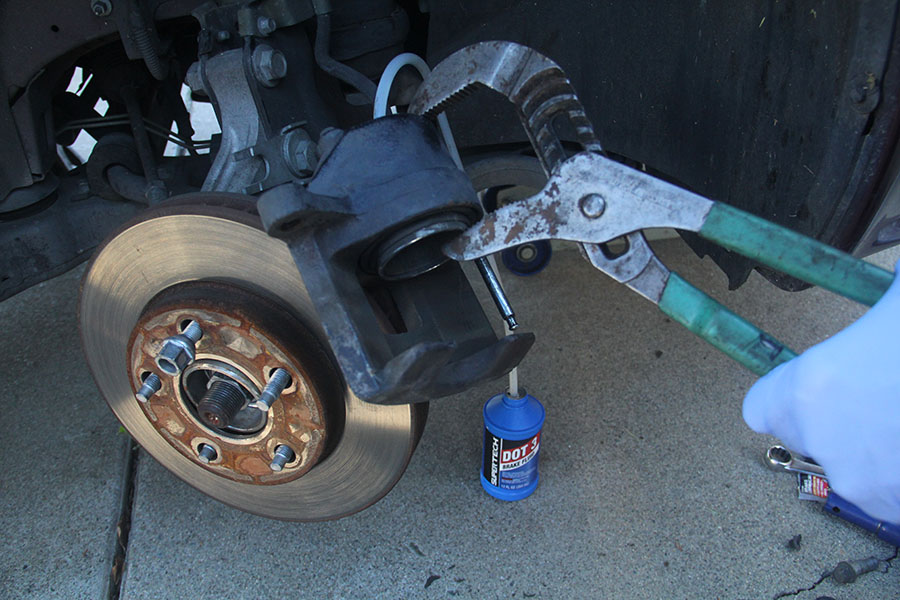
Next, you will press the caliper pistons back into the calipers. To do this you will need to open the bleeder screw and put a hose over the bleeder. Run the other end of the hose into an empty bottle. This will prevent the brake fluid from traveling backwards through the system and damaging other components especially your brake master cylinder.
Grab two larger sized flathead screwdrivers and use them to assist you in pressing the caliper pistons back into the caliper. Wedge one screwdrivers between each brake pad and the face of the brake rotor. Once both screwdrivers are wedged far enough between the brake pad and the rotor, push the inner screwdriver towards the engine and pull the outer screwdriver towards you until you see that all of the caliper pistons made their way back into the caliper. Then remove the brake pads and proceed to the next step.
Step 2
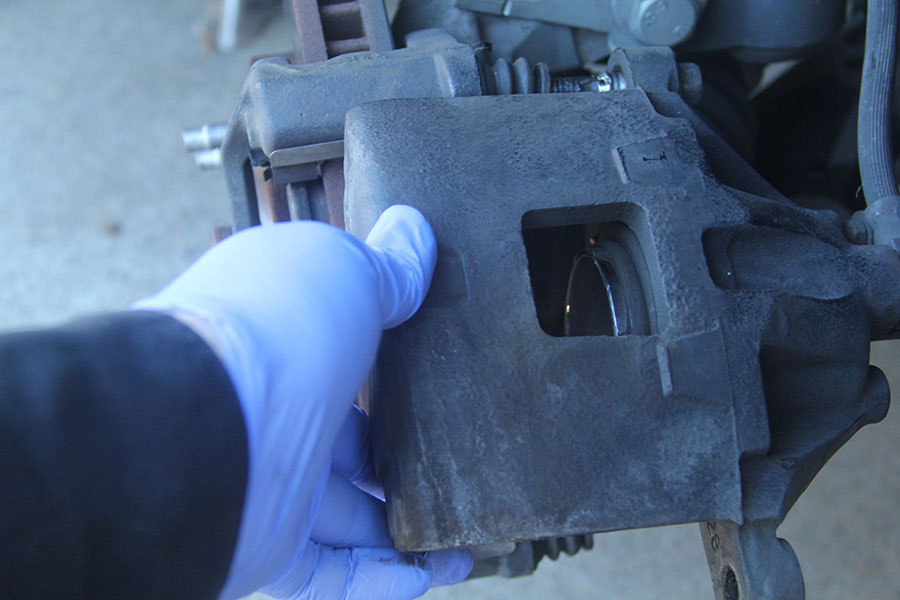
Remove brake caliper and set aside
There are a few different ways to remove brake calipers depending on the vehicle and what braking system you are dealing with. However, all calipers are much easier to remove if the steering wheel is turned all the way in the direction that makes the caliper bolts easily accessible.
Warning
Once the caliper is removed, hang it out of the way on a strut, spring, or control to avoid damaging the brake hose or brake line. Be especially careful on brake lines because they are hard and they do not flex. Instead, they will crimp and break.
One way a caliper can be removed is if the caliper is bolted to sliders, that are inserted into to a separate caliper bracket. With these type of calipers you can use either a proper sized wrench or a 3/8 inch ratchet with a proper sized socket. As long as the caliper has just one piston, then you can get away with just removing the lower caliper bolt, but sometimes both bolts may have to be removed. With the bolt(s) removed use a nice sized flathead screwdriver and pry the caliper up from the bottom. And then, push and wiggle the caliper toward the engine bay until the caliper slides out of the bracket. If the caliper is equipped with two pistons, then removing both the top in lower bolts is preferred for an easy disassembly of the brakes. Of course, a flat head screwdriver is still going to be your best bet in order to completely remove the caliper from the brake assembly.
Another way a caliper can be removed is if it appears that the vehicle is equipped with an earlier model Ford Truck or SUV front brake caliper. These calipers are attached by two caliper mounting pins. In order to remove these caliper mounting pins you will need to hit them out with a flat head screwdriver and a small handheld sledgehammer. Tap each mounting pin a little from the front and from the back so the mounting pin will come out evenly. Then you can go ahead and use a flat head screwdriver to assist you in prying the caliper off of the brake assembly.
Many other calipers require the removal of both caliper bolts prior to being able to pry off the caliper from the brake assembly. Caliper bolts vary from the type of bolt and the size of the bolt, so when removing these bolts be sure that you are using the correctly fitted tool with the least amount of rotational slack. Not all caliper bolts are shaped like a hexagon, caliper bolts could be shaped like an Allen bit keyway or a Torx bit keyway.
Warning
When removing or installing any caliper bolts that are either Allen bit or Torx bit, use added caution or damage can occur to the threads of the bolt or to the threads of the bolt’s hole.
It is rare, but you may encounter a caliper at some point in time that is mounted to the brake assembly by one single mounting bracket bolted to the bottom of the caliper. These type of calipers can be found on heavier, older trucks.
Once the caliper is removed and safely set aside, remove any caliper bracket that is blocking the front of the rotor by removing the two remaining caliper bracket bolts. Then, proceed to the next step of the repair process.
Step 3
Remove, Address, and Install the brake rotor

Anytime brakes become worn, the brake rotors need to be measured according to manufacturer guidelines. This means that the brake rotors do wear and eventually will either need a new machined finish or be replaced with new rotors, so removal of the brake rotor is necessary for a complete and safe repair to the front brakes.
Warning
brake rotors are easily subject to warpage and excessive damage due to prolonged heat from braking applications, therefore never overlook the brake rotor as the main culprit to your poor braking and/or brake noise concerns.
There are two categories that brake rotors fall under. Brake rotors can either be considered floating or non floating. Floating brake rotors are referred to as floating because these rotors fit freely over the outside of the wheel hub. Non floating rotors are any rotors that are attached to the wheel hub and bearing assembly.
To remove floating rotors, first inspect the rotor for any philips screws that require removing. If there are phillips screws that need removing, then following one of the two methods below. These screws can be extremely tight and not following one of these methods may result in the head of the screw to become stripped.
The first method consists of using an impact driver and a small handheld sludgehammer. Use one hand to insert the impact driver into the screw, while pushing on the impact driver as far as it will go and turning it toward the counterclockwise position. Just hit the impact driver with the small sledgehammer until the screw appears to turn.
The next method consists of using two hammers and a screwdriver that properly fits the screw. Using a ball pein hammer and a small handheld sledgehammer together can create enough energy to loosen the screw. With the ball portion of the hammer laying on top of the screw, hit the other side of the hammer with the small handheld sledgehammer several times. Then, use one of the hammers to tap the properly fitted screwdriver into the screw for its removal.
Once the screws have been removed from the floating rotor, the rotor still may not easily come off. If this is the case, then use a small handheld sledge hammer to tap on the hub portion of the rotor in between the wheel studs until the rotor falls off in your hand.
Warning
While hammering on the hub portion of the rotor, be careful not to damage the wheel studs.
Removing non floating rotors can be a bit more time consuming. Some non floating rotors, like those on Hondas, can take nearly two hours to remove and reinstall. Refer to our rotor removal and installation page for a broader breakdown of all the different types of non floating systems and how to repair them.
Step 4
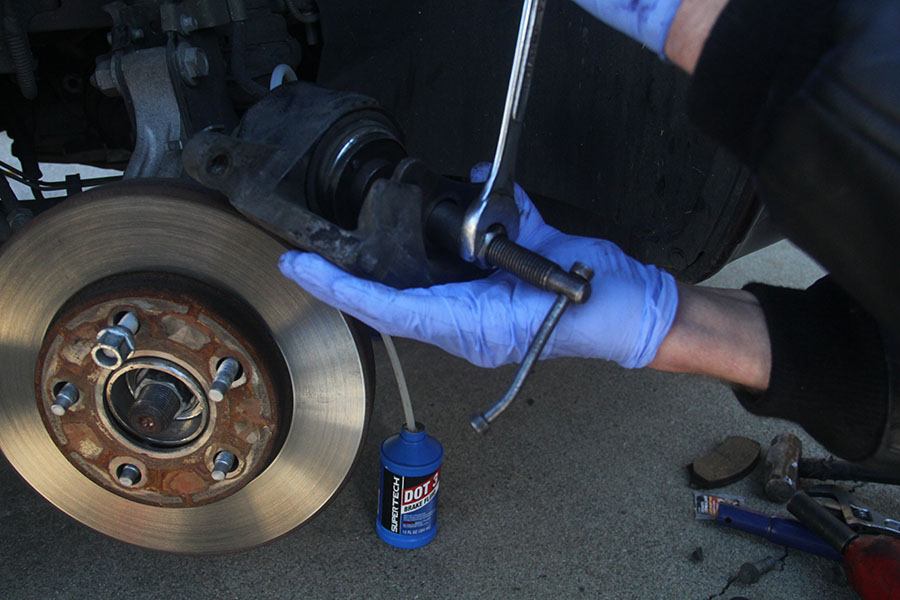
Prepare caliper for installation by pressing each piston in
If replacing the caliper then refer to our caliper removal and installation page of our website for further instructions.
There are several different ways to press caliper pistons back in depending on the number of pistons the caliper has and the type of caliper. Some tools necessary for the insertion of the caliper piston include: a large pair of channel locks, a special caliper piston tool, and/or a dual caliper piston insertion tool. Below are included explanations as to how to use each tool listed above.
Prior to pressing the caliper's piston back in, it is important to note what is actually taking place. When you press a caliper piston back in, you are in fact pressing the fluid that is behind the piston backwards through the hydraulic brake system. This backwards movement of the brake fluid can damage your brake master cylinder--the heart of your braking system.
To avoid putting the master cylinder in jeopardy, it is a good idea to open the bleeder screw and fit a hose over the bleeder and into a bottle. Once this is taken care of, it is then safe to proceed with pressing the caliper piston back in.
A large pair of channel locks is an ideal tool for brake repairs because they allow you to press most caliper pistons back in with little effort. Grab the large channel locks and open them over the caliper and its piston, while squeezing the two handles of the channel locks together. This should draw the piston back into the caliper. If it doesn't, then verify that the brake hose is not pinched. If the brake hoses not pinched, yet the caliper is still difficult to retract, then you will have to resort to another tool.
A caliper piston tool retraction kit is usually the next best thing if the channel locks are not successful with moving the caliper piston. Ideally, this kit is meant for retracting rear brake calipers, however we can also use the same kit for front brake calipers. There are many different circular adapters that the kit provides, but for the sake of retracting front brake calipers use the largest adapter in the kit.
After selecting the correct adapter you will begin to set up the tool on the caliper. Depending on the type of caliper tool you have, you may have to install the rectangular backing plate that comes equipped with the caliper tool kit. Some caliper tools already have this backing plate built into the tool. Next, wind the tool all the way in the clockwise position. Take the circular adapter and hold it on front of the tool with the flat side facing outwards. Then, insert the tool into the caliper with the backing plate on the inside of the caliper. Immediately turn the tool counterclockwise until tight. Make sure that the circular adapter is centered on the piston. Now you can use a wrench or a crescent wrench to continue to turn the caliper tool counterclockwise until the piston is completely back in. Then loosen and remove the tool by turning it to the clockwise position.
If attempting to press in a caliper piston, but the caliper has two pistons, then resort to using a dual piston retraction tool. This tool will allow you better access to both pistons so you can evenly press the two of them back in the caliper.
To operate the dual piston caliper retraction tool, first push on the release lever while pulling the handle all the way out. Next, take an old brake pad with one hand in hold it against both caliper pistons. With the other hand, insert the dual piston caliper depressor inside the caliper while squeezing the trigger. Once the tool makes contact with the pistons, you will need to add a little more effort and continue to squeeze the trigger until the pistons have gone all the way back into the caliper. Then, remove the tool by once again pushing on the release lever and pulling the handle out. The lever may not be as easy to press when the tool is locked to the caliper, so you may want to use a hammer to help tap on the lever to release the tool.
Step 5
Install brake pads and reattach caliper
On vehicles with four or six pistons, install the calipers and tighten its bolts to manufacturer specifications first, then install the new pads with a dab of brake lube on both ends of each pad.
Warning
Avoid getting any lube on the friction material of the pads or your vehicle’s brakes may not properly engage.
Prior to installing brake pads, it is a good idea to find a small handheld wire brush. Use this wire brush to brush off any brake dust that is on the caliper or it's bracket. If the new brake pads come with hardware, then replace the hardware before the brake pads are installed. Typically, this consists of prying the old anti-rattle clips out and popping the new ones in.
At this time install any brake caliper brackets that are separate from the caliper itself. When tightening down the brake caliper bracket, it is important to make sure you tighten the bolts according to manufacturer's specifications. That way the caliper bolts do not come loose and potentially fall off while driving the vehicle.
Once the caliper bracket has been reinstalled on the brake assembly, It is now time to install the brake pads. When installing brake pads, it is important to see what is responsible for securing the pads to the caliper. Some pads may require you to install an anti-rattle clip to prevent the pad from rattling during braking applications, or you may have to tweak some tabs on the pads in order for them to fit snugly on the caliper. The bottom line is, once the caliper is installed, you do not want any frontward or backward movement in the pads because the brakes will make all kinds of clicking noises when they are applied.
After the pads have been secured to the caliper and/or its bracket, the caliper is then ready to be installed. Take the caliper and fit it over the brake assembly, while keeping any sliders pushed in. This will allow you to line up the holes for the bolts much easier. Now, screw in the bolts as far as you can by hand to prevent any cross threading from taking place and ruining the bolt or the bolt’s hole. Then, tighten the bolts to manufacturer's specifications with a torque wrench to ensure a quality repair has been done. In addition, ensure that the flat sheet, which is behind the rotor and is refered to as the backing plate, is not touching the rotor. If it is, tweak it away from the rotor slightly by pushing it toward the engine bay with your hands. Otherwise this can cause a scraping noise while driving down the road even when you are not stepping on the brakes.
Once the brake pads have been lubed and installed, the new hardware has been installed, and the caliper has been fastened to manufacturer's specifications, proceed to the next step.
Step 6
Pump brake pedal and determine if brakes need to be bled
Warning
Anytime a brake service has been performed and the new brakes have been completly installed, it is mandatory to immediately pump the brake pedal several times before attempting to start and drive the vehicle. Failing to do so will result in complete brake failure when trying to stop the vehicle. Never attempt to pump the brake pedal while the brakes are still disassembled.
After pumping the brakes several times, the brake pedal should begin to feel firm. If the brake pedal does not feel as firm as you'd like, then follow the preceding instructions to help verify the acceptable firmness.
With the vehicle running, in drive, and stopped on a level surface, hold the brake pedal down with your left foot while you use your right foot to compare the height of the brake pedal versus the gas pedal. The height of both pedals should be even. if the height differs and the brake pedal is lower than the gas pedal, then this can be an indication that the brakes need to be bled.
Also, brakes require bleeding anytime the hydraulic portion of the system has been exposed to atmospheric air. Even if the bleeder screw on the caliper was just cracked, open air has the potential for entering the brake system. If the brakes are in need of bleading, then click here to view our brake bleeding portion of our website.
Step 7
Verify a successful repair has been performed
Verification is crucial for both the customer and for your personal satisfaction that the repair does not have any issues. Verification allows you to determine if indeed the problem that the vehicle had is 100% resolved or not.
During this process take the vehicle on a test drive. Drive the vehicle at various speeds, use different styles of maneuverability, and use different types of brake application techniques.
Driving at various speeds is important because this allows the brake pads to adjust as well as heat to normal operating temperature. Most brake noises and brake pulsations occur when both the rotor surface and the pads’ surface heat up causing expansion of these materials. Allowing the new brake pads to break into their new surface at both fast and slow speeds can aid in determining if the pads are indeed making 100% contact with their stopping surface.
If the brake pads do make noises when applying the brakes, then disassemble the brakes and inspect the friction material of the brake pad. New brake pads greatly vary in the quality of the friction material that the pad provides. That is why it is not advisable to buy the cheapest pads, but to stick with a quality brand that you trust. Good materials usually last longer and require less maintenance.

Share