

Brake Inspection
Performing a thorough brake inspection is always the first measure that should be taken prior to attempting any brake repairs. Looking at the whole brake system rather than just a portion of it can ensure a problem free repair job.
By taking the vehicle on a test drive, taking various brake measurements, and comparing them with manufacturer specifications will aid in quickly making an accurate diagnosis of the problem. Also, performing a regular brake inspection every 3,000 to 5,000 miles, or when rotating your tires, which ever comes first, may help you catch a problem before symptoms occur, or the brake rotor or drum is damaged beyond repair.
If the red brake light happens to come on, this could be an indication that the brake pads are worn, the brakes may have a fluid leak or the parking brake may not be fully disengaged. Anyway, if the brake light does come on, an inspection should be performed immediately and not postponed. Keep in mind that the brake light is red and not amber--indicating a serious issue. Loss of braking power is no laughing matter.
Generally speaking, brakes give the driver warning signs of potential problems well in advance of an actual failure, so you may be able to safely drive the vehicle to where it can be repaired. That is, as long as there is not a serious brake leak and loss of hydraulic pressure, indicated by a spongy or lower than normal brake pedal.
Warning Signs of Faulty Brakes
- Vehicle pulls to one side when braking
- Squeaking or squealing
- Grinding or scrapping sounds
- Clicking sounds
- Vibrations in the steering wheel
- Vibrations in the floor or seat
- Spongy or lower than normal pedal
- Burning odor from overheating
- Parking brake pulls too easily (clicks too many times)
The following step-by-step procedure will help you to properly identify all parts that are related to your brake problem.
Featured Video
Step 1
Verify Brake Issue is Present
Before diving directly into the brake inspection, It is a good idea to be aware of how the brakes are actually behaving.
That is:
- Does the brake pedal travel all the way to the floor or does the brake pedal feel soft and spongy?
- Are they Squeaking and/or Grinding or do they make another noise such as a clicking sound?
- Do they vibrate when the brake pedal is being applied?
- Do you smell an odor that is coming from the brakes?
- Does the vehicle pull to one side or the other when the brakes are being applied?
- Does the parking brake hold the vehicle or does it feel to loose?
Warning
If the brake pedal does not stop the vehicle, is abnormally low, or fades to the floor when the pedal is pressed then do not test drive the vehicle or death or serious injury can occur. Just proceed directly to the brake inspection.
It can even be helpful to test drive the vehicle by a wall when trying to isolate which wheel the brake noise is coming from. As you are driving by the wall with the windows rolled down, apply the brakes next to the wall to distinguish if the noise is coming from the front or the rear. If you need to you can have a passanger listen more closely.
Once you have verified the brake issue and have noted all the ways that the brakes are misbehaving, then proceed to the next step of the brake inspection and diagnostic.
Step 2
Check Brake Fluid for Level and Contamination
During any brake inspection you should always begin by first looking at the brake fluid. The brake fluid alone can tell you a lot about the condition of your brakes. For Instance, if the brake fluid is low, then the brakes could potentially be worn or there could be a leak somewhere in the hydraulic portion of the brake system.
The brake fluid can also become contaminated. Brake fluid is hygroscopic, which means that the brake fluid will absorb moisture from the atmosphere or surrounding air and this excessive moisture build up in the fluid can cause the brakes to become less effective. Such things as test strips can be used to determine if the fluid is in fact over due for a complete fluid change. Although visually inspecting the fluid can work to determine contamination, test strips are the way to go. If visually in specting the fluid you can only look at the darkness of the fluid. Brake fluid by itself should be clear.
Another way you can test the fluid for contamination is to test whether there is oil pressent in the brake fluid or not. Oil in the brake system is extremely detrimental to the entire brake system. This is because oil swells up any rubber making the part that contains the rubber unreliable and therefore ineffective. If oil does get in the brake system, then it is mandatory to replace all hydraulic brake components that contain rubber. These components include brake hoses, calipers and/or wheel cylinders and the brake's master cylinder. Oil in the brake system is usually contributed to someone adding the wrong fluid and this problem can be avoided all together if you are aware of what fluid to use in the first place.
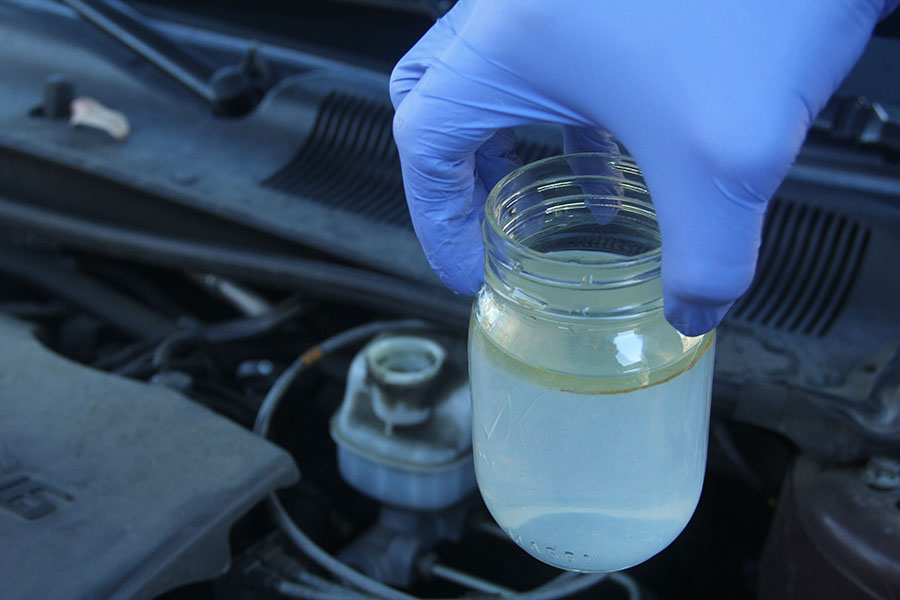
To test whether there is oil in the brake fluid, grab a clean cup of pure water and take a small sample of brake fluid directly from the vehicle's brake fluid reservoir and pour it in the water. Let the cup sit for a couple of minutes and then peak at the brake fluid/water mixture to see if oil has separated from the mixture. Because the brake fluid is hygroscopic, the brake fluid will mix with the water, whereas any oil in the mixture will separate from the water.
After inspecting the brake fluid for contamination, then proceed to the next step of the brake inspection and diagnostic.
Step 3
Is Brake Pedal Excessively Hard to Depress?
Step 4
Is the Brake Pedal Abnormally Low?
Step 5
Are the Brakes Squeaking or Grinding?
Step 6
Do the Brakes Vibrate When Pedal is Being Applied?
Step 7
Does the Vehicle Pull to One Side or the Other When Braking

Share